Friday, February 26, 2010

I Got the Raised Bed Blues!

Man oh man, will it ever get warm outside? First, Al Gore comes out with a warning everyone about global warming and then wham, much of the northern hemisphere gets the coldest winter on record. Go figure.

Every winter about this time (late February), I get a bit antsy to plant something in the raised bed area out back. This year, the urge is even more intense due to the cold weather and possibly to the economic times. This year, it’s even more important for many of us to plant vegetables for the dinner table. I got a feeling that, baring a miracle, prices will continue to rise at the grocery store. There was an article on the internet that told about how some grocery chains were hurting due to customers swarming in for the discounted deals while leaving everything else alone. I can’t say I blame them either. I’ve been doing the same thing lately myself.

So, while I’m waiting for Mother Nature to warm herself up, I’m going to have to be content myself with planting starter plants indoors. My first effort about three weeks ago went for naught as it was still too cold, even in the cold frames. However, now that the temperatures are routinely getting up to fifty, I think I’ll give it another go.

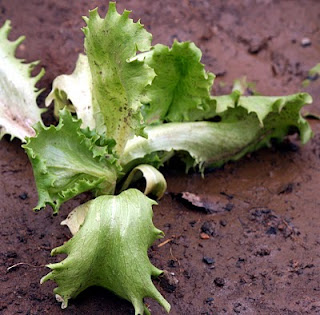
First on my list of early starts will be as much lettuce in the form of romaine as I can handle. This year I will be using seed that was purchased in 2009 and which has spent the winter in the fridge. Most seeds will store just fine if you can remember to keep them away from moisture and in a cool spot. I’m still getting ninety percent germination rates from this last batch. So far so good.

Next, once the seeds have germinated I will get them into the cold frames just as soon as possible. By doing this, I will prevent one of the major causes of disappointment for gardeners…loss of production due to environmental checks. Romaine plants are very cold hardy and will easily survive below freezing temps as long as they have had a chance to harden off and get established in the earth.

Other good candidates for early starts are radish seed (plant these directly into the cold frame for an early harvest), spinach and any other cole crop you might want to try. Just make sure to coddle the young plants for the first couple to three weeks before hardening them off. I’ll post an update as soon as I have some plants ready to go.

Garlic Growing Experiment


If you read my blog on ‘Growing Garlic in a Pot’ posted on the 9th of February you would know not to expect a very pretty looking plant. (I think the picture pretty much says it all). This looks more like an onion plant than anything else! Oh wait! Why yes, garlic is a member of that family. Stupid me. However upon a taste test, I can tell you that the leaves taste like…. garlic. What a surprise.

Now that spring is only a few weeks away (March 21st). I’m hoping to get the plant moved out to the garden where it can do its growing thing. Perhaps by August I will have some fresh cloves to harvest. Perhaps not. Anyway this was an experiment from the start and if nothing else, I can use the tops to flavor some recipes.

Saturday, February 13, 2010

Growing healthy vegetables requires the addition of ‘dirty’ soil!

Most gardeners who start their own vegetables from seed know to use a sterile starting mix at the beginning of the process. This practice allows for a good environment for seed germination, free of bad fungi or microbes that are responsible for such problems as damping off. I generally like to use a potting mix like Miracle Gro’s Seed starting mix that contains a water-absorbent formula with sphagnum peat moss and perlite, specially blended for fast germination of seeds. It’s also enriched with Miracle-Gro® plant food to help build strong roots. This mix will ensure that your germination efforts result in good starts and the fertilizer will help insure some food for hungry roots to feed on.

However, in order to prevent certain ‘growth checks’ that can result in poor fruit production later on, you should consider seeding the soil with microbial inoculants. A mix of good ‘bugs’ which will help protect your seedlings sensitive roots from attack by ‘bad’ microbes and fungi later on. The easiest way to do this would be to go out to your existing garden and dig up a little soil there to add to the top of the sterile mix your seedlings are growing in. The microbes will multiply very quickly in the days to follow. Some of these actually get involved in the transport of nutrients into the roots themselves! Then, by the time you are ready to transplant the young seedlings in to the garden (assuming you properly harden them off) they will be ready and able to fight off problem microbes and should prosper.

Tuesday, February 9, 2010

Growing garlic in a pot!


After doing some research on the internet, I came to the conclusion that planting garlic is not a very success prone venture unless you know exactly what you’re doing. Which I don’t. But, that’s never stopped me before and it won’t this time.

Now according to people who know about garlic, in Missouri Zone 6 you are supposed to plant garlic in mid October. Outside that is as in the garden. I elected to plant mine on February the 6th inside in a plastic 12” pot.

Next, according to those who know, you cut off the growing tips on about Memorial Day (late May) and then harvest them in July. By doing the cutting, the plant will supposedly put all its energy into making bulbs. OK? That sounds reasonable to me. I know for sure that if someone came around with scissors and cut my growing point off, I would immediately (after the pain subsided) focus on developing larger cojones. Right you are Fred!

So, with all the pomp and circumstance I could muster on short notice, I took two cloves that were growing all by themselves in the cupboard and plunked them down into a pot filled with fertilized potting mix (another no-no? Who knows)? These were then relegated to a spot that is sort of sunny in a window where they will suffer the occasional watering whenever I get to it care regime. A regime that, I will admit, is notorious for killing most everything that came before.

Stay tuned to this blog for updates. I do hope to get something for my five minutes of effort. This is America isn’t it?

Monday, February 8, 2010

Plan Your Spring Raised Bed Garden now!

Sure, winter is in full spring. As I write this it’s snowing outside and the temperatures are expected to drop into the teens over the next few days. So why even talk about gardening?

Well, I’m not actually talking about planting a garden. I’m referring to planning a garden! Now’s the time to begin thinking about your own objectives for the coming 2010 season. Let’s face it there’s not much else going on so what better time than now? Come March and you’ll be way too busy outside. So what are the things you can do right now?

One of the most important items on the garden checklist should be a Master Garden Plan. I generally keep mine on the computer, but in years past I would just buy a cheap calendar and make my notes on it. Just about now in December, you’ll begin to see the seed catalogs for the 2010 growing season and there’s a reason why the send them out now. That’s because a lot of experienced gardeners know that in order to have success in July, you must do a lot of thinking in February and March!

I like to break my plans into four categories; 1) Soil improvement schemes and raised bed expansion, 2) ordering the plants I want to grow 3) figuring when they should be started and 4) getting my seed starting area in the basement ready for operation.

Soil Improvement

Most soil improvement should actually be done at the end of the prior season while the soil was still workable. Last August, I made sure to take the compost pile I had created during the course of the summer and applied it to my two main raised beds. These measure about four feet by eight feet each and easily integrate any compost I am able to generate. (My third and smaller raised bed was built just last year and was constructed with store bought blended soil that still has time release nutrients in it. So, that one I’m not really worried about). I also made sure to test the pH of the soil and found I was OK there. You want to see a reading of about 6.7 to 6.9 or slightly acidic. Otherwise I would have added lime of sulfur depending on how much to soil was either too much acidic or alkaline. Another thing to make sure of is to keep the soil in each bed damp. We’ve had plenty of rain so far so there are no problems on that score. But, if the rain or snow doesn’t fall for any reason, make sure to water down the beds just enough to keep them on the damp side. Even though there are no plants growing at this time of years, you still have microbes in the soil that need some moisture to survive. A soil with lots of microbes is a soil that will produce a lot of crops.

I currently have about 64 square feet devoted to vegetables and have found this is plenty for two people. I practice the Square Foot method of gardening because I don’t like to have to work very hard. So on a good year, 64 square feet produces about 60 to 70 pounds of produce with not a lot of work. If you have a larger family or if you simply want to produce more veggies just go ahead and expand the number of raised beds you have. I like to keep mine at four by eight feet as that size is easy to erect and maintain. One last note concerning the care of the soil in a raised bed. Never work it when it’s damp and never, ever walk on it. Doing so will destroy its ability to grow anything other than weeds!

Planning and Ordering Seeds

I think that planning for what to grow is one of the best things you can do during the cold winter months. It’s a lot of fun to sit in the easy chair and dream about future harvests as you thumb through the seed catalogs. It’s also a great temptation to order everything in sight! But, please be careful. I can’t tell you how many times I’ve bit off way more than I could chew in the seed ordering department. Some years, I’ve had packages of seed that never even got opened! Stick with just a couple of varieties of any one plant. If you do have extra seed, check with the neighbors who also have gardens to see if they would like to trade some. This is one of the best ways to obtain seed that can cost an arm and a leg if you order them from commercial growers like Park Seed or Burpee. My personal plan includes anything that is expensive to buy at the store. Like romaine lettuce, bell peppers and tomatoes. I also like to grow green beans because they are prolific and actually improve the nitrogen content of the soil. Another good bet are fast growing seeds that can be grown close to other plants that take a little longer to mature. I will often use the radish as ‘markers’ also by planting them among carrot seeds. When the radish begin to show I know also where the other seeds were sown. Then the radishes are up and harvested long before they interfere with the carrots. Also, techniques like square foot, succession and inter-planting can dramatically improve your yield per square foot. With some practice, good planning and a little luck, you can get one to two pounds of produce per square foot in the course of a season!

Seed Planting Schedule

I think one of the most demanding aspects to a successful garden plan is knowing when and how much to plant. If you are starting everything from seed it can be quite a challenge indeed. You also have to able to ascertain just how much you can start at any given time. In my basement, I have a large table over which are grow lights. The total setup will accommodate about 100 seedlings and that’s all! Since some seedlings need up to a month or more on the grow table before they can go out, I have to really be able to plan well.

Seed Starting

Whenever possible I try and start all my plants from seeds. The reason for this is very simple. I’m a rather cheap bastard. I know that if I go to a nursery and get starter plants I will be really paying a high premium for my vegetables. If, on the other hand I grow seeds from seed, they are vastly cheaper. Also, I make it a point to trade unwanted seed for seed I can use to further reduce costs. The one area I do not scrimp on is the potting mix I use to get the seeds germinated and growing in. I always use fresh bags of sterile potting mix that has a little bit of fertilizer already in it. By doing that and by using larger than ordinary cells to start my seeds in, I can get them going early on (as early as February for lettuce) and then hold them until the weather stabilizes enough to plant them outside. You can also get a jump start by building and using a cold frame. Because I spent an afternoon a couple of years ago building two simple frames, I’m enjoying fresh romaine lettuce even now in the middle of winter. I’ve even made a number of You Tube videosupdates! to show how this is done along with

So, can the excuses and start your dream garden today!

Saturday, January 23, 2010

Homemade Tomato Sauce for Pasta!


While I was roaming around on the internet recently, I came across a home-made tomato sauce recipe published on a blog site called The God’s Cake. The author is English, I think, and indicated he has recently returned from Korea. His recipe was listed as follows:

“800g Tinned Whole Plum Tomatoes or You(sic) own poached Tomatoes, peeled (around 9 tomatoes with juice, roughly chopped), 3 garlic cloves, 1 glass of red wine, 1 glass of chicken stock, 1 large onion, hand full of fresh thyme, 2 tsp of sugar, salt and pepper to season.

First slice thinly the garlic and the onions and in a large pan with olive oil sauté until golden brown and soft, once done add the glass of wine and simmer for around 5 minutes, then add the sugar and a pinch of salt. Mix together until the sugar starts to thicken. Then add the tomatoes and stir. Simmer the mixture for a further 5 minutes and then stir in the chicken stock followed by a grind of pepper and salt. Bring the sauce to the boil and let it bubble for 5 minutes. Turn down the heat and simmer for 2 hours adding the thyme leaves. After set the sauce aside and let it cool at room temperature to capture all the flavors.”

I decided to give this one a go. I had most everything in stock. I was forced to go with a can of crushed tomatoes (its winter here) but was good to go on everything else.

Ingredients List:

1 15 oz can of crushed tomatoes
2 cloves garlic
10 oz red wine
15 oz can of chicken broth
½ large whole onion, sliced thin
1 tblsp dried thyme
1 tsp sugar (I’m assuming white)
1 tblsp olive oil
Salt and pepper as needed

Cooks Notes: I was not sure how much a ‘glass of wine’ or ‘stock’ actually is as was specified in the original text, so I guessed on this. I also guessed at the correct amount for the olive oil. Fresh thyme is also not available where I live, so I substituted some dried. At the last minute, I added some fresh mushrooms and dried oregano for the halibut. Note: Michael, who made this recipe later informed my that here was referring to about 250 ml or just over a cup!

I had a bit of this sauce with some spaghetti for lunch, just a little to test the taste. It was surprisingly good and I will want to make it again. You can see the video I made here!

Saturday, January 9, 2010

Say Yes to an Early Spring Salad!


Sure, it might be winter outside right now, but before you know it spring will be rushing past! That’s why even in January, I’m making seed purchases and getting ready for a fantastic garden salad harvest that will be way before my neighbors even get started!

Making this happen requires just a bit of planning, some seed starting equipment and  a small cold frame or two. (See my video on how to build a simple cold frame on You Tube). First off, you’ll want to get some seed ordered right now! I usually order mine online from one of many good outlets like Burpee Seed or Seeds of Change. My first order of the season will generally be a packet of romaine lettuce, spinach and mustard greens. (I’ll also order a packet or two of radish seed like Cherry Belle to use as markers and for an early snack as they can be ready to harvest in just 30 days).

When the seeds arrive, I’ll take a small folding table, some starter trays and a fluorescent light to begin growing my starter plants. The seed starting trays can be purchased at most garden centers or you can make your own. Just make sure to use a sterile starting medium (like Miracle Grow potting mix) to avoid disease problems like damping off.  From past experience, I will generally start about 30 seeds (a mix of romaine, spinach and mustard greens) in early February. This will generate enough salad plants early in the season to make up for the lag period while waiting for the direct seeded crops in my raised beds. These will be ready for the cold frames by mid-March. Now, since I already have romaine growing from the previous fall - (see my article Cold Frames Now Paying Off) I will just make a little room and set the tray into the cold frame for a couple of weeks or until conditions are favorable to plant in the raised beds.

In no time at all, you’ll have plenty of fresh salad greens for the table. With a little extra planning you can enjoy home grown lettuce for most of the year.